Day 31 Task: Launching your First Kubernetes Cluster with a Django-todo app running.


Awesome! You learned the architecture of one of the top most important tools "Kubernetes" in your previous task.
What about doing some hands-on now?
Let's read about Kubeadm and implement k8s in our local machine
What is Kubeadm?
Kubeadm is a tool to set up a minimum viable Kubernetes cluster without much complex configuration. Also, Kubeadm makes the whole process easy by running a series of prechecks to ensure that the server has all the essential components and configs to run Kubernetes.
It is developed and maintained by the official Kubernetes community. There are other options like Minikube, kind, etc., that are pretty easy to set up. You can check out my Minikube tutorial. Those are good options with minimum hardware requirements if you are deploying and testing applications on Kubernetes.
Features of Kubeadm?
Kubeadm’s Features
Common use cases for Kubeadm include testing, creating baselines for more advanced K8s deployments, and providing new K8s users with a simple starting point for cluster configuration. The specific features that make Kubeadm useful in those applications are:
Quick minimum viable cluster creation:- Kubeadm is designed to have all the components you need in one place in one cluster regardless of where you are running them.
Portable:- Kubeadm can be used to set up a cluster anywhere whether it's your laptop, a Raspberry Pi, or public cloud infrastructure.
Local development:- As Kubeadm creates clusters with minimal dependencies and quickly, it's an ideal candidate for creating disposable clusters on local machines for development and testing needs.
building block for other tools:- Kubeadm is not just a K8s installer. It also serves as a building block for other tools like Kubespray.
Task-01:
Install Kubeadm on your local
Following are the prerequisites for Kubeadm Kubernetes cluster setup.
Minimum two Ubuntu nodes [One master and one worker node]. You can have more worker nodes as per your requirement.
The master node should have a minimum of 2 vCPU and 2GB RAM.
For the worker nodes, a minimum of 1vCPU and 2 GB RAM is recommended.
Also, all the commands used in this guide for master and worker nodes config are hosted in https://github.com/Rohit1627. You can clone the repository for reference.
https://github.com/Rohit1627/Important_scripts.git
This guide intends to make you understand each config required for the Kubeadm setup.
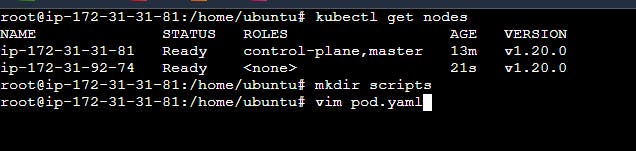
once you have done the all steps as mentioned in the script.

both the nodes are connected with each other.
Let's understand the concept of pod
A pod is a group of one or more containers. A container is an enclosed, self-contained execution process, much like a process in an operating system. Kubernetes uses pods to run your code and images in the cluster.
Kubernetes works with Pods, rather than containers so that containers in the same pod can be guaranteed to run on the same machine. Containers in the same pod share their networking infrastructure, storage resources, and lifecycle.

Task-02:
Create your first pod on Kubernetes through Kubeadm.
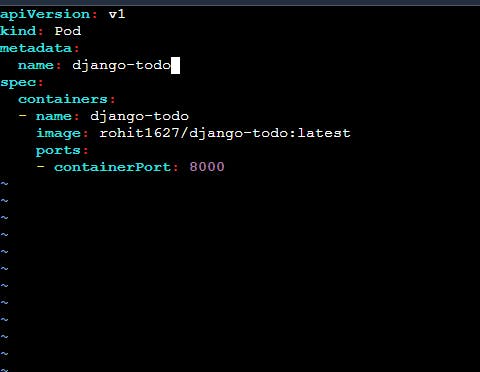
create Pod. yaml file
Write Pod. yaml file
saves the file and runs the kubectl apply -f pod. yaml
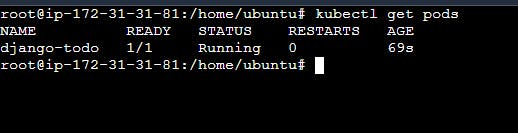
our first container runs on a worker node.

Thank you for reading!! I hope you find this article helpful......